How Do You Program A Craftsman Garage Door Opener Keypad: A Comprehensive Guide to Setting Up Your Keypad

How Do You Program A Craftsman Garage Door Opener Keypad

A Craftsman garage door opener keypad is a convenient and secure way to access your garage. Whether you’re coming home with your hands full or just prefer the ease of keyless entry, the keypad allows you to open the garage door with a simple code. Programming a Craftsman garage door opener keypad might seem intimidating at first, but it’s a simple process that can be done in just a few minutes.

How Do You Program A Craftsman Garage Door Opener Keypad

In this article, we’ll walk you through the steps to program a Craftsman garage door opener keypad. You’ll also find useful troubleshooting tips and answers to common questions to help you set up your keypad with ease.

Why You Should Program Your Craftsman Garage Door Opener Keypad

Programming your Craftsman garage door opener keypad has several benefits:

  • Convenience: You don’t need to carry a remote control or key to enter your garage.
  • Security: The keypad allows you to set a personal 4-digit code, keeping unauthorized users from accessing your garage.
  • Ease of Use: No need to worry about losing a remote—just remember your code.
  • Family Access: Multiple people in the household can have their own personalized code, allowing easy access to the garage for everyone.

If you’re ready to program your Craftsman garage door opener keypad, read on for the detailed steps and useful tips.

Read too: Craftsman Garage Door Opener Troubleshooting Won’t Close: Quick Fixes and Solutions

How Do You Program A Craftsman Garage Door Opener Keypad?

To get started, follow these easy steps to program your Craftsman garage door opener keypad. Make sure you have your garage door opener’s model number and the required code information before you begin.

Step 1: Locate the “Learn” Button

Before you begin programming, find the “Learn” button on your Craftsman garage door opener unit. This button is typically located on the back or side of the motor unit, near the antenna. It is often labeled with the word “Learn” or a small colored LED light.

The “Learn” button is essential for syncing the keypad with your garage door opener.

Step 2: Clear Any Existing Codes

If you’re setting up the keypad for the first time, or if you want to reset it, start by clearing any previously programmed codes. To do this, press and hold the “Learn” button until the LED light turns off. This will reset the system, removing any stored codes and allowing you to start fresh.

Step 3: Enter Programming Mode on the Keypad

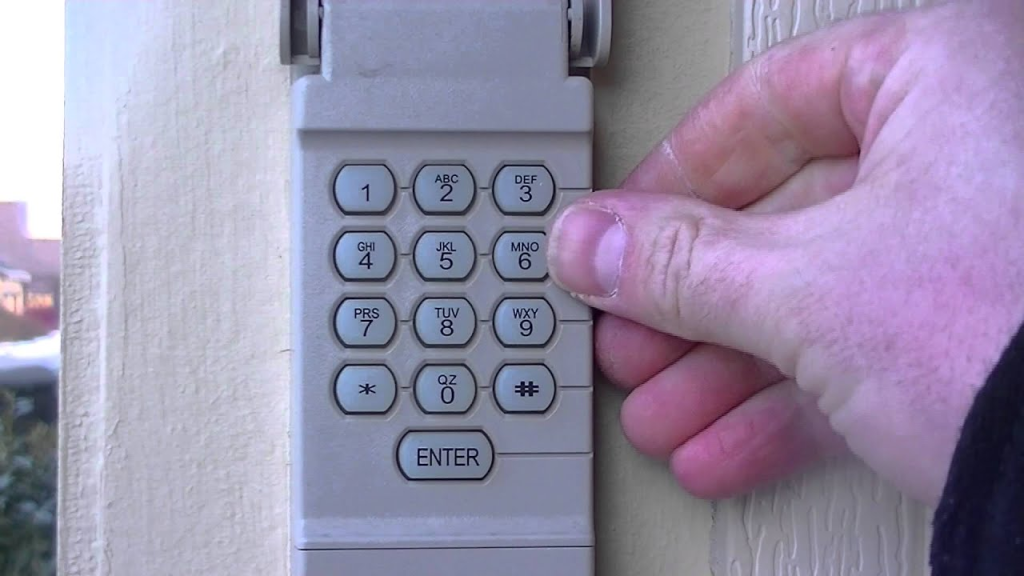
Now, head over to your Craftsman garage door opener keypad. Follow these steps to enter programming mode:

  • On the keypad, press and hold the “Enter” button. While holding the “Enter” button, you should see the LED light on the keypad begin flashing.
  • After the LED light flashes, release the “Enter” button. This action indicates that the keypad is now in programming mode and ready to receive a code.

Step 4: Enter the 4-Digit PIN Code

Now it’s time to enter your 4-digit PIN code. This code will be the one you’ll use to open the garage door. Keep in mind that this code should be something easy to remember but hard for others to guess.

  • Type in your desired 4-digit PIN code on the keypad. Make sure to press each number firmly.
  • Once you’ve entered your code, press the “Enter” button on the keypad.

Step 5: Sync the Keypad with the Garage Door Opener

After you’ve entered your PIN code and pressed “Enter,” it’s time to sync the keypad with the garage door opener.

  • Return to the garage door opener unit and press the “Learn” button.
  • The LED light on the motor unit will blink, indicating that it is in syncing mode.
  • Within 30 seconds, press and hold the “Enter” button on the keypad again. Hold it until the garage door opener’s motor unit lights flash or you hear a click sound. This indicates that the programming was successful, and the keypad is now synced with your garage door opener.

Step 6: Test the Keypad

Now that you’ve completed the programming process, test the keypad to make sure everything works correctly.

  • Enter your 4-digit PIN code on the keypad and press “Enter.”
  • The garage door should open or close, depending on its current state. If the door operates as expected, your keypad programming was successful.

Step 7: Add Additional Keypad Codes (Optional)

If you want to add additional codes for other family members or guests, repeat the process above. Each person can have their own unique 4-digit code to access the garage.

To program an additional code, simply follow the steps for entering programming mode and syncing the keypad with the garage door opener, using a different 4-digit PIN each time.

Troubleshooting Common Issues

While programming your Craftsman garage door opener keypad is a straightforward process, there may be some issues you encounter along the way. Here are some common problems and solutions:

1. The Keypad Doesn’t Sync with the Opener

If the keypad doesn’t sync with your garage door opener, try the following:

  • Make sure you pressed the “Learn” button on the motor unit and the “Enter” button on the keypad at the correct times.
  • Double-check that you pressed the “Enter” button on the keypad after entering your code to confirm your selection.
  • Ensure that the keypad is within range of the opener when you’re syncing it.

2. The Keypad LED Doesn’t Flash or Respond

If the keypad LED doesn’t flash when you press the “Enter” button, check the following:

  • Ensure the keypad is properly powered and that there is no issue with the battery.
  • Try replacing the keypad batteries if necessary.
  • Reset the keypad by holding down the “Enter” button for several seconds.

3. The Keypad Is Unresponsive After Programming

If the keypad seems unresponsive after programming:

  • Recheck the 4-digit PIN code you entered. Ensure it matches the code you programmed into the garage door opener.
  • Clear any existing codes and try the programming process again from the beginning.
  • If the keypad continues to malfunction, contact customer support for further assistance.

Tips for Maintaining Your Craftsman Garage Door Opener Keypad

Once you’ve successfully programmed your keypad, here are some tips to help keep it in good working condition:

  • Keep the keypad clean: Use a soft cloth to clean the keypad and remove any dust or dirt that may affect its functionality.
  • Replace the batteries regularly: Over time, the batteries in your keypad will drain. Replace them every 1-2 years, or as soon as the keypad starts showing signs of low battery.
  • Avoid programming the same code for multiple keypads: For added security, avoid using the same code across multiple keypads, especially in large households or communities.

Conclusion

Knowing how to program a Craftsman garage door opener keypad is an essential skill for ensuring convenient and secure access to your garage. By following the steps outlined in this guide, you can easily program your keypad and enjoy a smooth, keyless entry experience.

Whether you’re setting up a new keypad or resetting your current one, the process is simple and effective. If you encounter any issues, refer to the troubleshooting section, and with a little patience, your keypad will be working like new in no time.

Craftsman Garage Door Remote Battery Size: Everything You Need to Know for Optimal Performance

Craftsman Garage Door Remote Battery Size

Garage doors are essential for the security and convenience of your home. When your Craftsman garage door remote stops working, the problem is often linked to the battery inside. One crucial factor that many homeowners overlook is the Craftsman Garage Door Remote Battery Size. Choosing the right battery size ensures that your remote control operates efficiently and reliably. In this article, we’ll explore the importance of selecting the correct Craftsman Garage Door Remote Battery Size, how to choose the best battery, and tips for maintaining your remote control’s performance.

Craftsman Garage Door Remote Battery Size

Why the Craftsman Garage Door Remote Battery Size Matters

The Craftsman Garage Door Remote Battery Size plays a critical role in ensuring that your remote control works as expected. If you use the wrong battery size, your remote might not function correctly, or the battery may drain faster than it should. Here’s why the right size matters:

1. Efficient Power Consumption

The correct battery size ensures that your remote control receives the appropriate amount of power for optimal performance. Using a battery that is too small can lead to frequent battery changes, while using a battery that is too large might result in the remote not fitting properly or even damaging the circuit.

Read tooo: Craftsman Garage Door Opener 1/2 HP Programming for Effortless Setup

2. Longer Battery Life

A properly sized battery ensures that your remote lasts longer without needing frequent replacements. Batteries that fit perfectly and are designed for your device’s power requirements offer the best longevity.

3. Proper Fitting and Safe Operation

If the battery size is incorrect, it could lead to loose connections or issues with the remote’s performance. A properly sized battery fits securely in the battery compartment, ensuring that the remote works as it should without any issues.


What is the Correct Craftsman Garage Door Remote Battery Size?

When selecting a Craftsman Garage Door Remote Battery Size, it’s important to refer to your specific remote model’s manual. However, most Craftsman garage door openers and their remotes use standard battery sizes. The two most common battery types for Craftsman garage door remotes are:

1. 3V CR2032 Coin Cell Battery

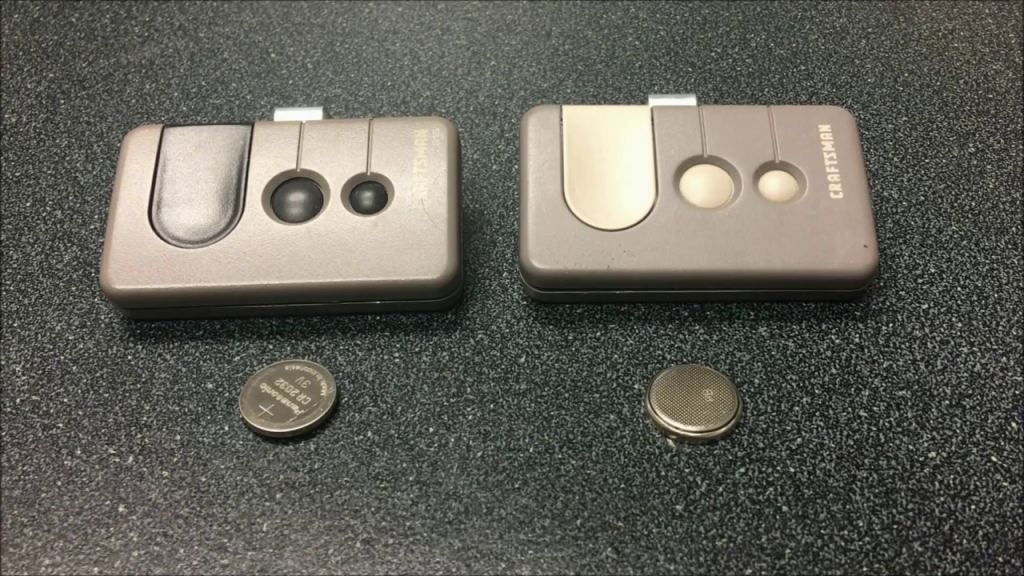
The CR2032 is a common coin cell battery used in many Craftsman garage door remotes. This small, flat battery typically powers remotes for a long time, given its efficient energy consumption. The CR2032 is popular because it is compact, widely available, and cost-effective. Most Craftsman garage door remotes that require a small, thin battery will use this size.

2. 3V CR2016 Coin Cell Battery

Another commonly used battery for Craftsman garage door remotes is the CR2016. Like the CR2032, the CR2016 is a coin cell battery, but it is slightly thinner. These batteries are used in some Craftsman garage door remotes that require a smaller size. The CR2016 also offers long-lasting performance and is a widely available, budget-friendly option.

It’s essential to refer to your remote’s manual to confirm which of these batteries is compatible with your specific model.


How to Choose the Right Craftsman Garage Door Remote Battery Size

Choosing the correct Craftsman Garage Door Remote Battery Size may seem tricky, but it’s straightforward if you follow a few simple guidelines:

1. Refer to Your Remote’s Manual

The most reliable way to determine the correct battery size is by consulting the manual that came with your Craftsman garage door remote. The manual will specify the exact battery model needed, including the voltage and size. If you no longer have the manual, you can often find this information on the manufacturer’s website.

2. Check the Current Battery

If the battery in your remote has already been used, you can check its size by removing the old battery. You’ll find the battery’s size and model number printed directly on it. If the battery appears damaged or old, replacing it with the same size will help restore your remote’s functionality.

3. Choose from Common Battery Types

Most Craftsman garage door remotes use either CR2032 or CR2016 coin cell batteries. When in doubt, check the label on the back of your remote to see if the battery size is listed.

4. Battery Voltage

The voltage rating of the battery is crucial. For most Craftsman garage door remotes, a 3V battery is standard. Ensure you select a battery with the same voltage rating to avoid damage to the remote’s internal circuitry.


Steps to Replace the Battery in Your Craftsman Garage Door Remote

Now that you know how to choose the right Craftsman Garage Door Remote Battery Size, let’s look at how to replace the battery. This is a simple process that anyone can do at home:

1. Open the Remote Control

To replace the battery, first, open the remote control. Most remotes have a small notch on the side where you can insert a coin or small tool to pry open the case. Be gentle to avoid damaging the remote.

2. Remove the Old Battery

Once you’ve opened the remote, remove the old battery carefully. Note the orientation of the battery – which side is facing up. This will be important when inserting the new battery.

3. Insert the New Battery

Insert the new Craftsman Garage Door Remote Battery Size (such as CR2032 or CR2016) into the battery compartment. Be sure to place the battery in the correct orientation, with the positive side facing up (or as indicated by the remote’s battery compartment).

4. Close the Remote Control

Once the battery is in place, carefully close the remote control. Make sure it clicks shut securely, and check that the remote is functioning properly.

5. Test the Remote

After replacing the battery, test the remote by pressing the buttons. If it works as expected, you’re done. If not, double-check the battery orientation or try a new battery.


Maintaining Your Craftsman Garage Door Remote

While changing the Craftsman Garage Door Remote Battery Size is relatively easy, maintaining your remote is also essential for longevity and optimal performance. Here are a few maintenance tips:

1. Replace Batteries Regularly

Even with the best care, batteries will eventually lose their charge. It’s a good idea to replace the battery in your Craftsman garage door remote every 1-2 years, depending on usage. If the remote begins to operate erratically, it may be time for a new battery.

2. Clean the Remote Control

Dirt and debris can build up over time on your remote. Periodically clean your remote with a soft cloth to remove dust, dirt, and grime. Avoid using harsh chemicals that may damage the remote’s casing.

3. Avoid Exposure to Extreme Conditions

To ensure the longevity of the Craftsman Garage Door Remote Battery Size, avoid exposing the remote to extreme temperatures, moisture, or direct sunlight. Store it in a cool, dry place when not in use.


Conclusion

The Craftsman Garage Door Remote Battery Size is a key factor in ensuring your remote operates reliably and for a long time. By choosing the correct battery, such as the CR2032 or CR2016 coin cell batteries, and following the simple replacement steps, you can enjoy uninterrupted operation of your garage door remote. Regular maintenance and timely battery replacement will also help keep your remote functioning like new.

Craftsman Garage Door Back Up Battery: Why You Need One for Uninterrupted Operation

Craftsman Garage Door Back Up Battery

A garage door is an essential part of your home’s security and convenience. But what happens when the power goes out? Without a power source, many garage door openers stop working, leaving you with no easy way to get in or out of your garage. That’s where the Craftsman Garage Door Back Up Battery comes into play. This innovative solution ensures that your garage door remains functional, even during power outages, offering peace of mind and convenience for homeowners.

Craftsman Garage Door Back Up Battery

In this article, we will dive deep into the Craftsman Garage Door Back Up Battery, exploring its features, benefits, installation process, and how to maintain it for reliable performance.


What is a Craftsman Garage Door Back Up Battery?

The Craftsman Garage Door Back Up Battery is a critical component for your garage door opener system, designed to provide power to the opener when the electricity goes out. It ensures that your garage door remains operational, allowing you to open or close it even when there’s no power from the grid.

Most modern Craftsman garage door openers come with an integrated back up battery system. The Craftsman Garage Door Back Up Battery typically connects directly to the opener’s motor unit. It is charged during normal operation when the power is on and automatically takes over during a power failure. This ensures your garage door operates seamlessly and without interruption.

Read tooo: Craftsman Garage Door Opener 1/2 HP Programming for Effortless Setup


How Does the Craftsman Garage Door Back Up Battery Work?

A Craftsman Garage Door Back Up Battery functions in a straightforward manner, providing power to your garage door opener in the event of a power outage. Here’s how it works:

1. Regular Operation

When the power is on, the garage door opener functions normally, using your home’s electrical supply to operate the door. The Craftsman Garage Door Back Up Battery is continuously charged while the system is operating under normal conditions.

2. Power Failure

If a power failure occurs, the Craftsman Garage Door Back Up Battery automatically switches on to power the opener. You don’t need to do anything manually – the system detects the outage and seamlessly switches to battery power.

3. Battery-Operated Garage Door

Once the battery kicks in, the garage door operates just as it would with regular power. Depending on the model of your opener, the battery will allow you to open and close the garage door several times before it needs recharging.

4. Recharge When Power Is Restored

Once the power is restored, the system will automatically recharge the Craftsman Garage Door Back Up Battery, preparing it for the next time you need it.


Benefits of Having a Craftsman Garage Door Back Up Battery

There are several reasons why having a Craftsman Garage Door Back Up Battery is a smart choice for homeowners. Here are some key benefits:

1. Uninterrupted Operation

One of the most important benefits of a back up battery is that it ensures uninterrupted operation of your garage door. Power outages can occur unexpectedly, leaving you stranded without a way to open or close your garage door. With a Craftsman Garage Door Back Up Battery, you won’t be left in the dark.

2. Added Security

During a power outage, your garage may be a vulnerable entry point for intruders if the door is left open or inaccessible. With a back up battery, your garage door remains secure, providing continuous protection for your home.

3. Convenience and Accessibility

Imagine being stuck outside your garage in the middle of a power outage – it’s not a fun situation. With the Craftsman Garage Door Back Up Battery, you can still access your garage without any problems. This is especially useful if your garage is your primary entry point or if you store important items inside.

4. Ideal for Emergency Situations

If you live in an area prone to frequent power outages or severe weather conditions, having a Craftsman Garage Door Back Up Battery can be a lifesaver. In emergencies, you won’t have to worry about your garage door failing when you need it most. Whether you’re trying to escape from a storm or simply trying to get your car out of the garage, a back up battery ensures that your garage door operates under any condition.


How to Install a Craftsman Garage Door Back Up Battery

Installing a Craftsman Garage Door Back Up Battery is a relatively simple process, but it requires following the manufacturer’s instructions closely to ensure it works properly. Here’s a general overview of how to install the backup battery:

1. Gather Your Tools and Materials

Before starting the installation, make sure you have all the necessary tools and materials, including:

  • The Craftsman Garage Door Opener with a back up battery (or just the battery, if you’re upgrading an existing opener)
  • Screwdrivers
  • Wrenches
  • Power drill
  • Mounting brackets (if needed)
  • Safety goggles and gloves

2. Disconnect the Power Supply

For safety, always disconnect the power supply to the garage door opener before beginning installation. This will prevent electrical shocks during installation.

3. Mount the Garage Door Opener

If you’re installing a new Craftsman Garage Door Opener that includes a back up battery, mount the opener motor unit according to the manufacturer’s instructions. Make sure it’s securely attached to the ceiling of your garage and aligned with your garage door.

4. Install the Back Up Battery

Most Craftsman Garage Door Opener models with a back up battery have a designated space within the opener for the battery. Install the battery into this compartment and connect it to the motor unit following the instructions. Make sure all connections are tight and secure.

5. Connect the Wires

Next, connect any necessary wiring from the battery to the opener motor unit, ensuring all connections are properly made. Follow the wiring diagram in the manufacturer’s manual to avoid errors.

6. Test the System

Once everything is installed, reconnect the power supply and test the system to ensure it works correctly. Test the garage door opener to ensure that it opens and closes smoothly. Simulate a power outage to ensure the battery backup takes over seamlessly.


Maintaining Your Craftsman Garage Door Back Up Battery

To ensure that your Craftsman Garage Door Back Up Battery continues to work reliably, regular maintenance is essential. Here are some tips for keeping your system in top condition:

1. Test the Backup Battery Periodically

Periodically test the battery backup system to ensure it’s holding a charge. Simulate a power outage by disconnecting the main power supply, and check if the garage door operates smoothly. If the battery doesn’t power the opener properly, it may need replacement.

2. Replace the Battery When Necessary

Like all rechargeable batteries, the Craftsman Garage Door Back Up Battery will eventually wear out. Most batteries last between 3 to 5 years, depending on usage and the model. If the battery no longer holds a charge or the system struggles to operate during an outage, it’s time for a replacement.

3. Keep the Opener and Battery Clean

Dust and dirt can interfere with the functionality of your opener and battery. Regularly clean the motor unit and the battery compartment to prevent debris buildup.


Conclusion

A Craftsman Garage Door Back Up Battery is a valuable addition to any garage door opener system, offering convenience, security, and reliability. With its ability to keep your garage door functioning during power outages, this simple but powerful feature ensures you can always access your garage. Whether you live in an area prone to power outages or just want peace of mind knowing that your garage door will always work, the Craftsman Garage Door Back Up Battery is an essential investment.