How To Program Craftsman Garage Door Opener Keypad: A Step-by-Step Guide

How To Program Craftsman Garage Door Opener Keypad

If you’re looking to enhance the convenience and functionality of your garage door system, programming a Craftsman garage door opener keypad is an essential task. Keypads provide secure, keyless entry to your garage, making it easier for family members or trusted individuals to access your home.
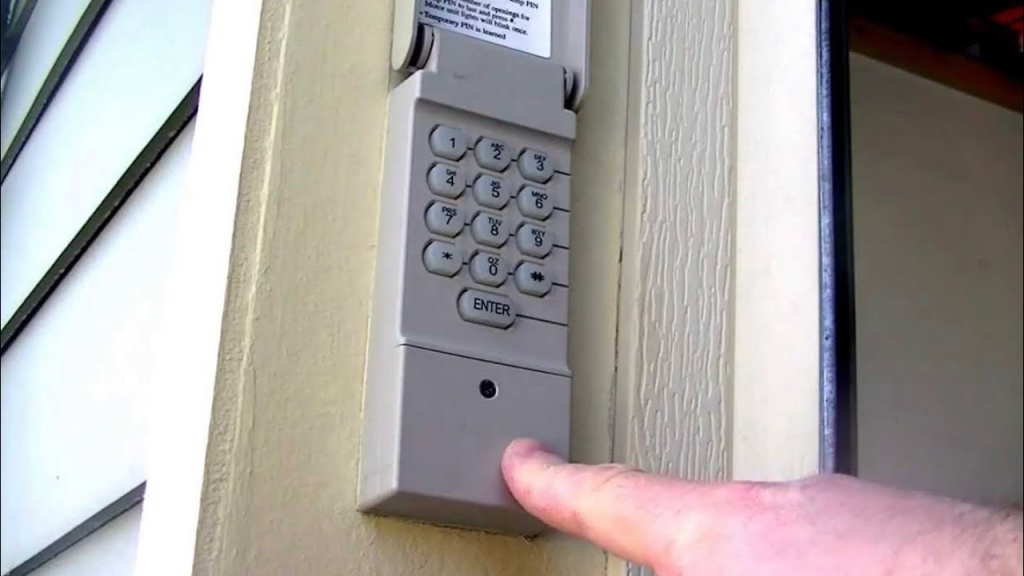
How To Program Craftsman Garage Door Opener Keypad

In this comprehensive guide, we’ll walk you through the process of programming your Craftsman garage door opener keypad, provide troubleshooting tips, and highlight the advantages of using this innovative device.


Why Use a Garage Door Opener Keypad?

Convenience and Accessibility

A keypad eliminates the need to carry a remote or keys, allowing access with a simple code.

Enhanced Security

Craftsman keypads come with features like rolling codes, which change the code every time you use it, reducing the risk of unauthorized access.

Read tooo: Craftsman Garage Door Opener 1/2 HP Programming for Effortless Setup

Multiple User Capability

You can set unique codes for different individuals, such as family members, neighbors, or service providers.


Tools You’ll Need

Before starting the programming process, gather these essential tools:

  1. A Craftsman garage door opener keypad.
  2. The user manual for your specific Craftsman model (optional but helpful).
  3. Access to the garage door motor unit.
  4. A stable ladder (if needed) to reach the motor.

How To Program Craftsman Garage Door Opener Keypad

Step 1: Locate the “Learn” Button on the Motor Unit

  1. Go to the garage door opener motor, typically mounted on the ceiling.
  2. Look for the “Learn” button—it’s usually located on the back or side of the motor unit and may be red, green, orange, or yellow depending on the model.

Step 2: Press the “Learn” Button

  1. Press and release the “Learn” button. The indicator light on the motor unit will turn on, signaling that it is ready to receive a new code.
  2. You usually have about 30 seconds to complete the next steps, so be prepared to act quickly.

Step 3: Enter a Code on the Keypad

  1. On the keypad, type in a 4-digit PIN of your choice. Make it something memorable but not easily guessed by others.
  2. Press the “Enter” button on the keypad.

Step 4: Test the Keypad

  1. Wait for the garage door to respond. If it opens or closes, the programming is successful.
  2. If not, repeat the steps, ensuring you follow the timing accurately.

Advanced Programming Features

Setting Temporary Access Codes

  1. Temporary codes can be programmed to allow access for specific times or purposes, such as when expecting a repair service.
  2. Check the user manual for instructions specific to your Craftsman keypad model.

Programming Multiple Doors

  1. If your keypad is compatible with multiple garage doors, you can program it to control different doors by assigning unique PINs to each.
  2. Follow the steps above for each garage door opener unit.

Troubleshooting Common Issues

Keypad Not Responding

  • Check the batteries: Replace old or weak batteries in the keypad.
  • Inspect the signal: Ensure there’s no interference between the keypad and the motor unit.
  • Reset and reprogram: Perform a factory reset on the keypad and repeat the programming steps.

Garage Door Doesn’t Respond to Keypad Commands

  • Verify the PIN: Double-check that you’re entering the correct PIN.
  • Reposition the keypad: Ensure the keypad is within range of the motor unit.
  • Inspect the motor unit: Check for any visible damage or loose wires.

The Keypad Stops Working Over Time

  • Regularly clean the keypad to remove dirt or debris that may interfere with button functionality.
  • Replace the batteries at least once a year to maintain consistent performance.

Benefits of Programming Your Craftsman Keypad

Improved Home Security

A securely programmed keypad reduces the risk of intruders gaining access to your garage.

Flexibility in Access Control

Set temporary codes for guests or service personnel without compromising your primary PIN.

Ease of Use

No need to fumble with remotes or keys—simply enter your PIN to operate the garage door.


Maintaining Your Craftsman Garage Door Keypad

1. Battery Replacement

  • Use high-quality batteries to ensure long-lasting performance.
  • Replace batteries immediately if the keypad becomes unresponsive.

2. Weatherproofing

  • Craftsman keypads are typically weather-resistant, but installing them in a sheltered area can prolong their lifespan.

3. Regular Testing

  • Test the keypad monthly to ensure it works correctly.
  • Verify all programmed codes are functioning as intended.

Enhancing Your Garage Door System

Pairing your Craftsman keypad with additional accessories can improve functionality:

Remote Controls

Keep a remote control in your vehicle for quick access when driving.

Smart Garage Door Openers

Upgrade to a smart system to control your garage door via smartphone, even when you’re away from home.

Security Cameras

Install a camera near your garage to monitor activity and enhance security.


How To Program Craftsman Garage Door Opener Keypad for Different Models

While the programming process is similar across Craftsman models, there may be slight variations. Refer to your user manual for model-specific instructions.

Older Craftsman Models

  • Some older models require additional steps, such as pressing a specific combination of buttons on the keypad.
  • Consult the manual or contact Craftsman customer support for assistance.

Smart-Enabled Craftsman Keypads

  • Smart keypads may integrate with home automation systems, allowing you to program and control them through an app.
  • Follow the app’s setup guide for seamless integration.

Final Thoughts

Programming your Craftsman garage door opener keypad is a straightforward process that enhances the convenience and security of your home. Whether you’re setting it up for the first time or troubleshooting an issue, following these steps ensures a smooth and efficient experience.

Take the time to explore advanced features like temporary codes and multi-door programming to maximize the keypad’s utility. Regular maintenance, such as battery replacement and testing, keeps the device performing optimally for years to come.

By mastering your Craftsman keypad, you’ll enjoy the ease of keyless access while maintaining robust control over who can enter your garage.


How To Open Craftsman Garage Door Opener Keypad: A Comprehensive Guide

How To Open Craftsman Garage Door Opener Keypad

A Craftsman garage door opener keypad is a convenient tool that adds security and flexibility to your garage access. But what happens when you need to open the keypad casing for maintenance, troubleshooting, or battery replacement? Understanding how to open Craftsman garage door opener keypad is essential for keeping your system functional and efficient.

How To Open Craftsman Garage Door Opener Keypad

In this guide, we’ll walk you through the step-by-step process of opening the keypad, identifying its components, and addressing common issues. By the end, you’ll feel confident handling your keypad for any situation.


Why Knowing How To Open Craftsman Garage Door Opener Keypad Is Important

Maintaining your Craftsman keypad ensures it remains reliable and secure. Here’s why learning this simple task matters:

  1. Battery Replacement: Accessing the keypad allows you to change its battery to prevent operational interruptions.
  2. Troubleshooting: If your keypad isn’t functioning, opening it gives you the opportunity to inspect internal components for damage or wear.
  3. Cleaning and Maintenance: Dust, dirt, or debris can accumulate over time. Opening the keypad lets you clean it for optimal performance.
  4. Programming Access: Some Craftsman models require access to internal buttons for resetting codes or reprogramming.

Whether you’re addressing a specific issue or performing routine upkeep, this guide will help you navigate the process with ease.

Read tooo: Craftsman Garage Door Opener 1/2 HP Programming for Effortless Setup


Step-by-Step Guide on How To Open Craftsman Garage Door Opener Keypad

1. Gather the Necessary Tools

Before you begin, gather a few basic tools to make the process easier:

  • A small flathead screwdriver or similar prying tool
  • A clean, dry cloth for cleaning components
  • A new battery, if replacing the existing one

Having the right tools ensures you can open the keypad without causing damage.


2. Locate the Keypad’s Access Point

Most Craftsman keypads are designed with an access point that allows for easy opening. This is usually found at:

  • The Bottom of the Keypad Casing: Many models have a small slot or latch underneath.
  • The Back Panel: Some keypads require you to remove them from the wall to access the battery or internal components.

Inspect the keypad for visible seams or slots to identify where it opens.


3. Open the Keypad Casing

Here’s how to safely open the keypad:

Step 1: Pry Open the Bottom Latch

  1. Insert a flathead screwdriver or prying tool into the small slot located at the bottom of the keypad.
  2. Gently apply pressure to release the latch or pop open the cover.

Step 2: Remove the Back Panel (If Applicable)

  1. If the battery or internal components are accessible from the back, unscrew or unclip the keypad from the mounting bracket.
  2. Slide the back panel downward to expose the interior.

Step 3: Be Gentle

Use light pressure during this process to avoid cracking the plastic casing or damaging internal parts.


4. Replace the Battery

One of the most common reasons to open a Craftsman keypad is to replace the battery. Here’s how:

Step 1: Remove the Old Battery

  1. Locate the battery compartment inside the keypad.
  2. Gently remove the old battery, paying attention to the polarity (+/-) orientation.

Step 2: Insert the New Battery

  1. Insert the new battery, ensuring it’s aligned correctly with the positive and negative terminals.
  2. Secure the battery firmly in place.

Step 3: Test the Keypad

  1. Before closing the casing, test the keypad by entering your code to ensure the new battery is working.
  2. If the keypad doesn’t respond, double-check the battery placement.

5. Inspect for Damage or Wear

While the keypad is open, take the opportunity to inspect its internal components:

  • Check for Loose Wires: Ensure all connections are secure and intact.
  • Clean the Interior: Use a dry cloth to wipe away any dust or debris that may hinder functionality.
  • Examine the Buttons: Look for worn-out buttons that may need replacement.

Performing this checkup can help extend the lifespan of your keypad.


6. Close the Keypad

Once you’ve replaced the battery or completed your inspection:

  1. Align the keypad cover or back panel with its original position.
  2. Press gently until you hear a click or snap, indicating it’s securely closed.
  3. Reattach the keypad to the wall if it was removed.

Troubleshooting Common Issues After Opening the Keypad

Even after following these steps, you might encounter problems. Here’s how to resolve them:

Issue 1: Keypad Doesn’t Respond After Closing

  • Solution: Double-check that the battery is correctly installed and secure. Also, ensure the keypad cover isn’t pinching any internal components.

Issue 2: Code Entry Isn’t Recognized

  • Solution: Reprogram your keypad by pressing the Learn Button on your garage door opener and entering a new PIN.

Issue 3: Buttons Feel Stuck

  • Solution: Open the keypad again and clean the buttons thoroughly. Replace the keypad if the buttons are worn out.

Maintaining Your Craftsman Garage Door Opener Keypad

Regular maintenance keeps your keypad in good working condition. Follow these tips:

  1. Replace Batteries Annually: Weak batteries are a common cause of keypad issues. Keep spares on hand for quick replacement.
  2. Keep the Keypad Clean: Wipe down the exterior with a damp cloth and clean the interior during battery replacement.
  3. Protect from Weather: If your keypad is exposed to rain or extreme temperatures, consider adding a weatherproof cover.
  4. Test Regularly: Periodically test the keypad to ensure it’s functioning correctly.

Frequently Asked Questions About How To Open Craftsman Garage Door Opener Keypad

Q1: Can I open the keypad without tools?

Yes, many Craftsman keypads feature a latch or clip that can be opened by hand. However, a small screwdriver makes the process easier.

Q2: How do I reset the keypad after opening it?

Press the Learn Button on the garage door opener, then re-enter your desired PIN on the keypad and press Enter to reset.

Q3: What should I do if the keypad casing is damaged?

If the casing is cracked or won’t close properly, consider replacing the keypad to prevent further issues.

Q4: Can I open the keypad while it’s mounted on the wall?

Yes, most Craftsman keypads can be opened without removing them from the wall. However, if the back panel needs access, you’ll need to unmount it.


Conclusion

Understanding how to open Craftsman garage door opener keypad is a crucial skill for maintaining its functionality. Whether you’re replacing a battery, troubleshooting an issue, or cleaning the interior, following these simple steps ensures a hassle-free process. Regular maintenance and careful handling will extend the life of your keypad, keeping your garage secure and convenient.

If problems persist after opening and inspecting the keypad, consult your user manual or contact Craftsman customer support for assistance.